How to track your website URLs with Google Analytics
Do you publish your website on social media, in email newsletters, or printed materials? You’ll likely want to track your website URLs and how they are used across the different sources where your marketing or website is shown to people.
The good news is there’s a free tool, the Google Campaign URL builder, which can make this achievable without too many headaches.
This blog post will explain how to use the tool effectively so that you can track your efforts within your Google Analytics 4 setup.
How to use the Google Campaign URL Builder
The Google URL campaign builder uses the Urchin Tracking Module (UTM) method to track your website page across the web.
Like a sea urchin sticks itself to rocks in the ocean, the UTM attaches itself to your original URL with some information (called a parameter) to your website link so that when a user lands on that page, that detail can be passed to Google Analytics 4.
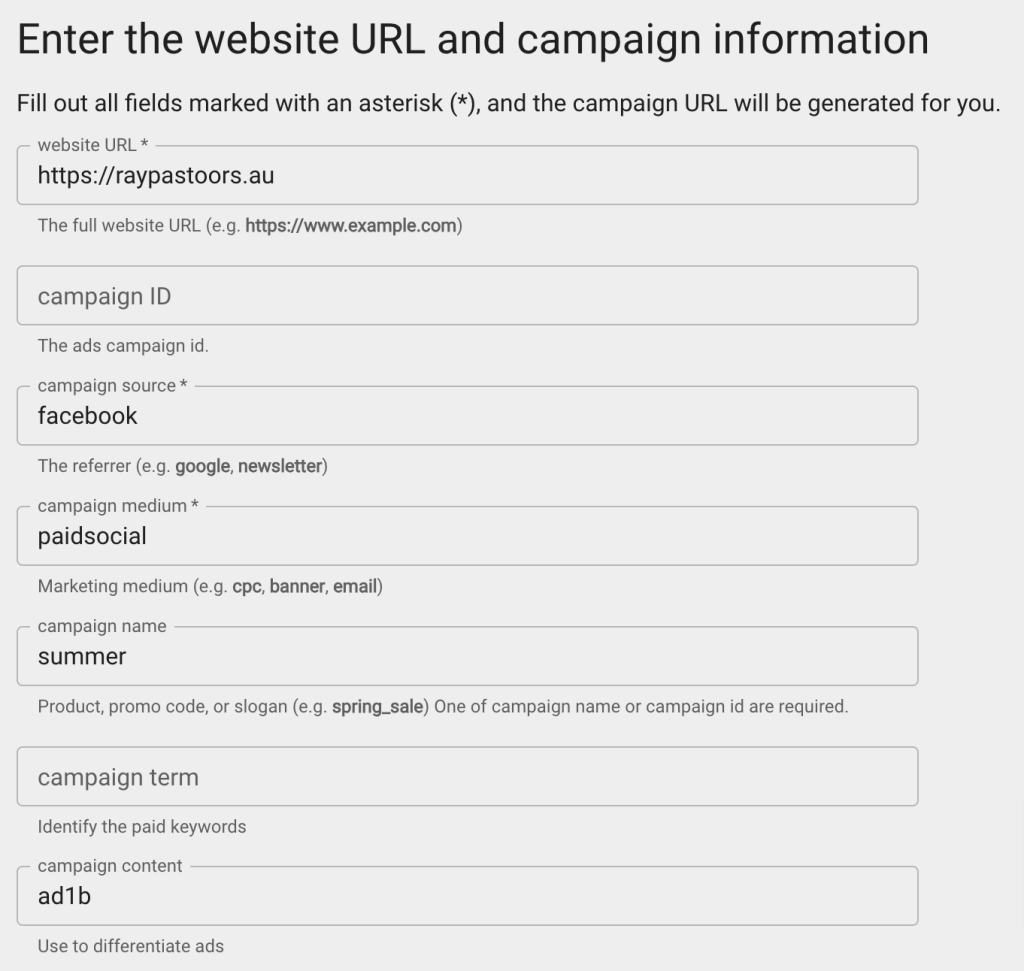
Pictured below is an example of how this looks:
Website URL
The website URL needs to contain:
Your complete website address as it appears in your web browser.
The URL needs to include the page you want people to go to. For example, https://raypastoors.au is just the website URL, but we need to define the page name, too.
Campaign ID
This is commonly used to differentiate between campaigns and for cost-per-click or Google Ad campaigns. If you left the auto tag option enabled in Google Ads, this is already done for you.
Campaign source
Where is the traffic coming from? Not the type of channel but the actual name of the source. For example, Facebook, publication name, etc.
referral for external websites sending you traffic
Campaign name
Use this consistently so you can compare your marketing campaigns or digital efforts. For example, to easily compare Financial Year Campaigns, I’d keep the campaign name the same each year to compare them with previous periods. You may add a naming convention that also attaches the year so that you can compare your data across different dates.
Campaign term
This one is also used for Google Ads purposes. If you left the auto tag option as on, this will be sorted for you based on your Google Ad settings.
Campaign content
It can be used to differentiate your content, either by where the link is placed in an email or material, or to test with different ad variations. For example, suppose I am running a social media campaign and have more than two creatives. In that case, I can set the campaign URL differently here to see which ad variation resulted in a sale.
Benefits of using a tracked URL tool
Better tracking: UTM parameters allow for accurate tracking of where traffic is coming from, helping to measure the effectiveness of different marketing campaigns.
Detailed Insights: Provides granular data on traffic sources, mediums, campaign names, terms, and content.
Customisable: You can create custom tracking codes tailored to specific campaigns, platforms, or ads.
Improved Attribution: Helps in better attribution of traffic and conversions to specific campaigns or marketing activities.
Performance Comparison: This allows for easy comparison of different marketing efforts to identify which perform best.
Optimisation: With cleaner data, you can optimize future marketing strategies based on what works.
Breakdown or group similar traffic together: Facilitates traffic segmentation (grouping) in analytics tools, enabling more precise audience analysis.
Flexibility: Can be used across various platforms and for multiple types of campaigns (email, social media, SMS, etc.).
Influences Budget Allocation: It helps make data-driven decisions about where to allocate marketing budgets for the best return on investment (ROI).
Limitations of the Google URL builder
The Google URL builder (UTM tool) does have some cons, including:
Manual Process: Creating UTM parameters manually can be time-consuming and prone to human error.
Data Inconsistency: Inconsistent naming conventions can result in issues for data analysis.
URL Length: UTM parameters can make URLs very long and messy, which is not user-friendly and may look unprofessional when shared. To avoid this, use the shortener link tool.
Privacy and Security: Long URLs with detailed parameters can expose campaign details, so avoid giving away too many details. You can also adopt an internal code name for audiences.
Difficult to Edit: Once a URL with UTM parameters is live, updating or correcting errors in the parameters requires distributing new links, which can be cumbersome.
Overrides Direct Traffic: UTM parameters sometimes override direct traffic in reports, leading to inaccurate attribution.
Can you use the URL builder for your website banners or content?
The tool should only be used on external websites and sources outside your website.
When you use it internally, you remove valuable information about where the person came from before they reached your website.
If you want to track someone clicking on a banner, consider creating an event instead.
Where to see the URL data in Google Analytics 4
Acquisition Reports
Traffic Acquisition Report
Navigate to Reports > Acquisition > Traffic acquisition. If you’re using the Lifecycle report, look for Leads > Traffic Acquisition.
In this report, you can see the traffic sources, including those tagged with UTM parameters.
Use dimensions such as “Session source/medium” or “Session campaign” to break down the data using UTM parameters.
User acquisition report
Navigate to Reports > Acquisition > User acquisition. For the Lifecycle report, Leads > User Acquisition.
This report shows how new users are arriving at your site. You can similarly use dimensions like “First user source/medium” and “First user campaign” to view UTM-tagged traffic.
Explore (Explorations)
Go to the main menu outside of reports and click Explore.
Create a new exploration, such as freeflow or blank, and then add dimensions like “Session source/medium,” “First user source/medium,” or other relevant UTM parameters.
Drag the items from the left side and place them into the column or rows section.
You’ll also need to define the value, e.g. sessions (visits).
Use filters or segments to focus on specific UTM-tagged traffic.