In this post, we will explain how you can set up your Google Analytics 4 property as a beginner and guide you through the process.
Updated: May 2024 – to include recent changes on the platform.
You’ll find some steps below missing from Google Analytics setup assistant but are key to ensuring you collect the right level of data for your website and or app.
One of the main benefits of Google Analytics 4, compared to Universal Analytics, is its event capabilities. You can tag up and track these events to understand better users and what actions they do and do not take. We have tailored packages depending on your website that dive deeper into the setup and assist you with tracking key events on your website.
The first step is to ensure you are signed in to the Google account you want the Analytics account associated with.
Then, head to Google Analytics.
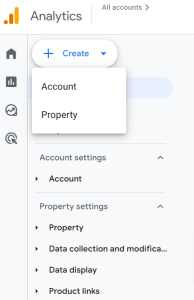
If you’ve set up an account before, your screen will show you any existing accounts. In this case, you’ll want to click the Admin (gear icon) in the bottom left corner. Then, at the top left, look for the “Create” button to create a new account or property.
Use the account function to create a separate account (e.g., setting up a property for a different business/person). To create a property under your existing account, select the property option.
If there is none, the screen will entice you to create a GA4 property.
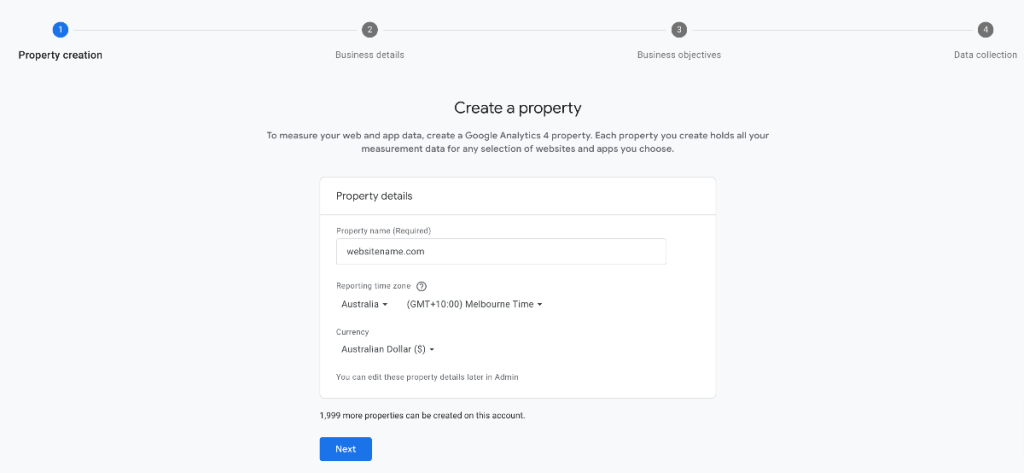
Property name: your website address or preferred name, e.g. Business Name.
Reporting time zone: choose the country and region where your website operates. Or you’ll be using reports from. You can only have one-time zone per property.
Currency: your local currency.
Then press the “Next” button.
Good to know: If things change in your Google Analytics 4 setup or website, or you’ve missed a selection, you can adjust your details later.
This step aims for Google Analytics to understand who is using its platform. However, it may also be used down the track for benchmarks if Google brings this feature back from Universal Analytics.
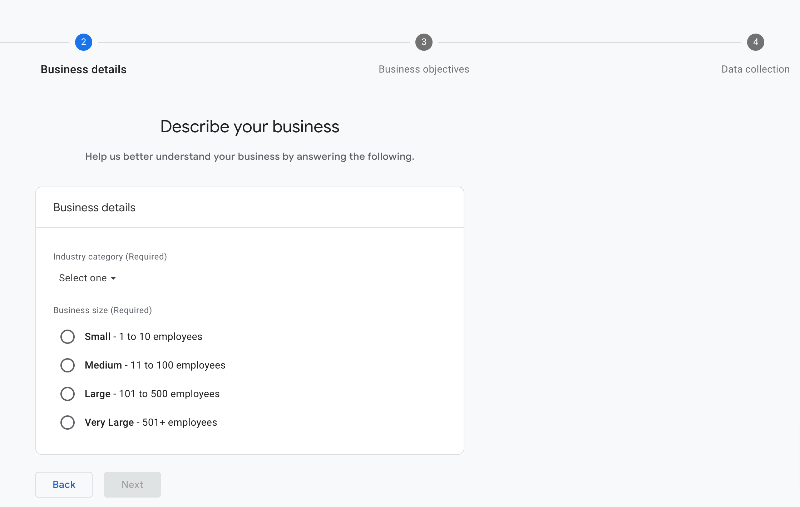
Industry category: select the closest industry that matches your website or business.
Business size: choose the size of your website based on how many employees you have.
Select “Next” to go to the next slide.
This step was added in March 2023 and is designed to tailor what reports show in your Google Analytics property.
For those who set up GA4 prior, you would have Lifecycle reports.
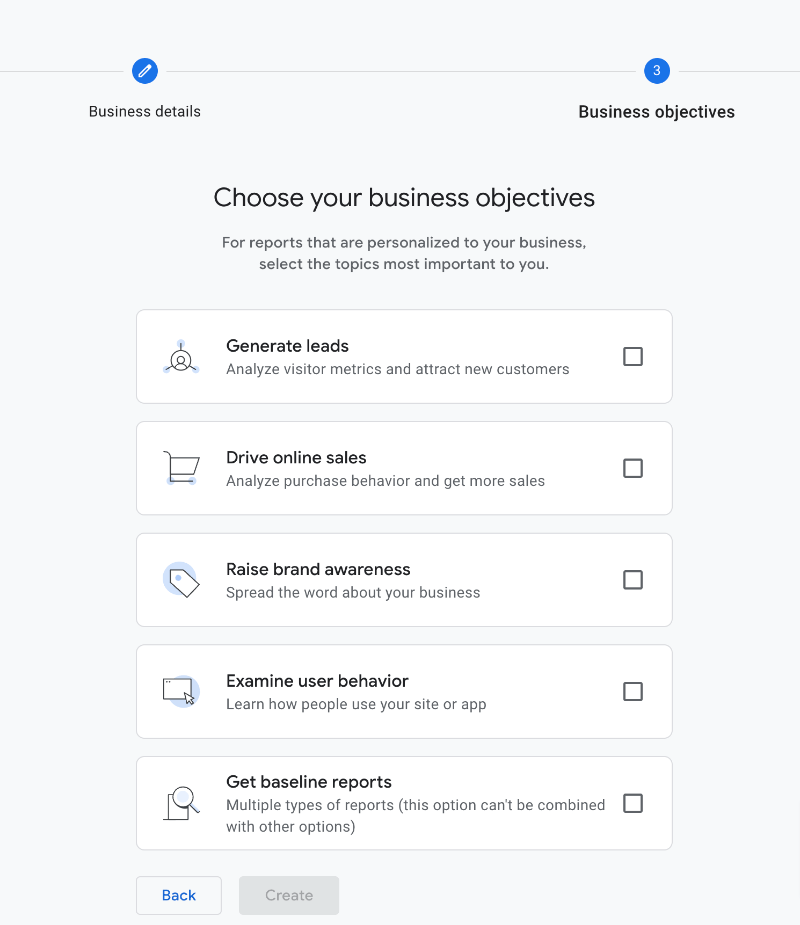
Generate leads:
Drive online sales:
Raise brand awareness:
Examine user behaviour:
Baseline reports:
A combination of the above reports.
Select the reports you need, then press “Create” to jump to the next step.
Good to know: You can change the reports and their names later in the report library. You can also bring back the Lifecycle report menu if you prefer this.
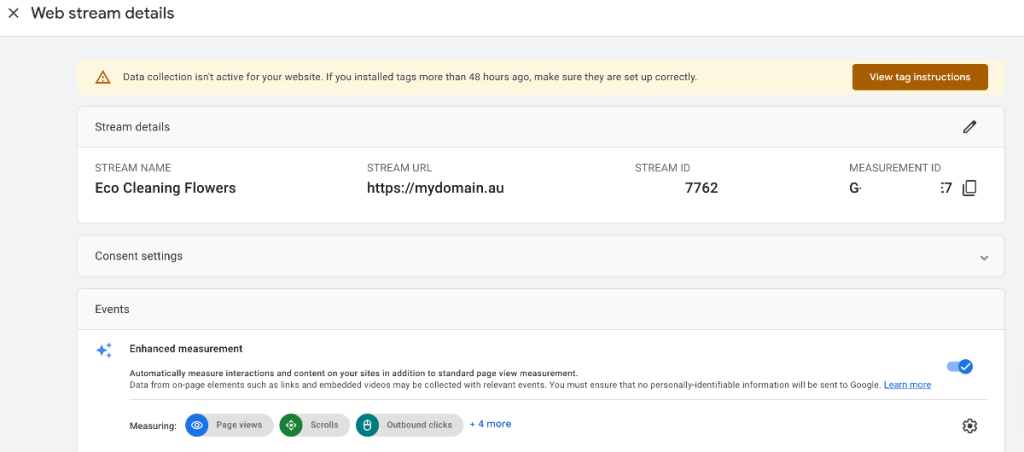
In Google Analytics 4, rather than views, we have something called data streams.
A data stream brings data into GA4 reporting. There are three types of data streams. Most people will have only the web platform option, as most do not run Android or iOS apps.
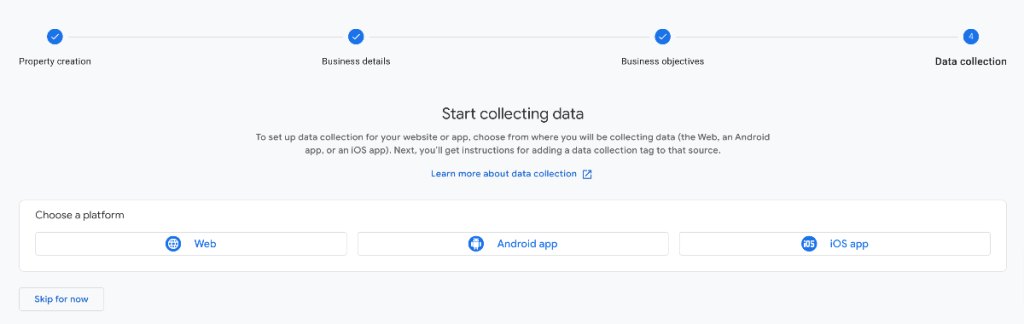
Web: a website. The website includes sub-domains, e.g. member.mydomain.com.
If other websites are attached to the same business or organisation, Google Analytics recommends cross-domain tracking (you’ll find this in the advanced settings later). You can set this up and use one data stream to simplify the setup. Or decide to create a second web data stream at your discretion.
Android app: if you run an Android device app for your business, e.g. an app on Google Play store.
iOS app: for those with an app on Apple’s App store.
The data stream is where you pop in the website (or app details).
It’s also where you decide what enhanced measurement events you want to toggle on or off.
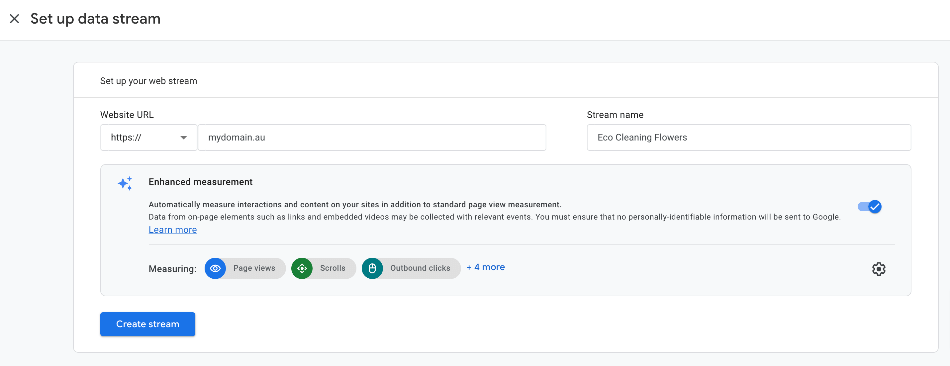
Enhanced measurements are the auto-tagged events available in Google Analytics 4.
You have the following options:
It’s a good idea to test whether these events are firing correctly. Some websites, such as single-page application sites, may experience scroll issues.
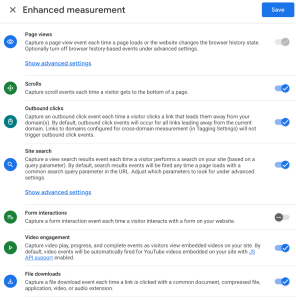
Good to know: Your data streams automatically exclude known bots and spiders!
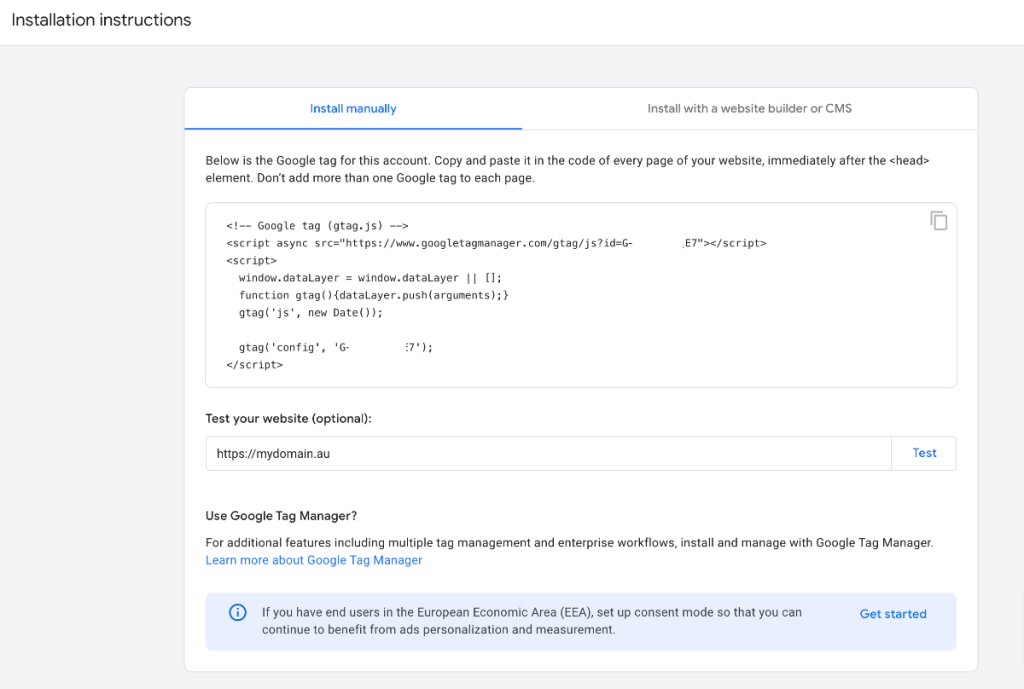
You now have your stream/s set up; the next step is to install the tag. You’ll want a tag on every page from which you wish to collect data.
You can use an existing on-page tag or create a new one.
As you reach this page, the “View tag instructions” button can be used, and you may also find a window that opens up to that page to help you install the tag.
There are two main types of ways to install a Google Analytics 4 tag:
Good to know: Google promotes Google Tag Manager for this task and offers detailed instructions. Google Tag Manager is a free tool that keeps your website tracking tags tidy across multiple platforms. For example, you can use Google Tag Manager to create tags for Linkedin, Meta, Hotjar (scroll and heatmaps) and many other tools. It’s a bit techy, so you may need our help.
Google provides you with two tabs for the installation.
Install code manually or choose a common website builder or Content Management System.
Or the Google Tag Manager option.
Google has provided thorough details relating to setup options for common websites.
Currently, the tool has the following:
We’ve collated the most common ones here with our top recommendations.
WordPress is a leading content management system that powers more than 40% of websites on the World Wide Web.
You can install Google Analytics in a few ways, and the option you choose will depend on your preference.
Plugins: one-click connection or the G Measurement ID
Website builder level: full javascript code method
Theme file: full javascript code method
Be mindful that if you change themes, you’ll need to remember to repeat this step. It’s also recommended to copy the full code as a backup, in case your code change causes any issues.
The Google and YouTube channel app is a great option and free for Shopify stores.
If you want to set up server-side tracking because you accept a large volume of sales and want fewer discrepancies with your data, then paid options like Littledata from $99 USD a month or Elevar ($0 option for up to 100 orders a month) provide these options and more data for your Google Analytics 4.
There is also Analazify, which offers lifetime access but is not server-side tracing, for $749 USD.
You can also install the Google Analytics code in your theme, but is less recommended as you have to remember not to forget it when changing themes. If you prefer to do this, Go to online store > themes > actions (on relevant themes) > edit code > theme.liquid > add code to <head> tag section.
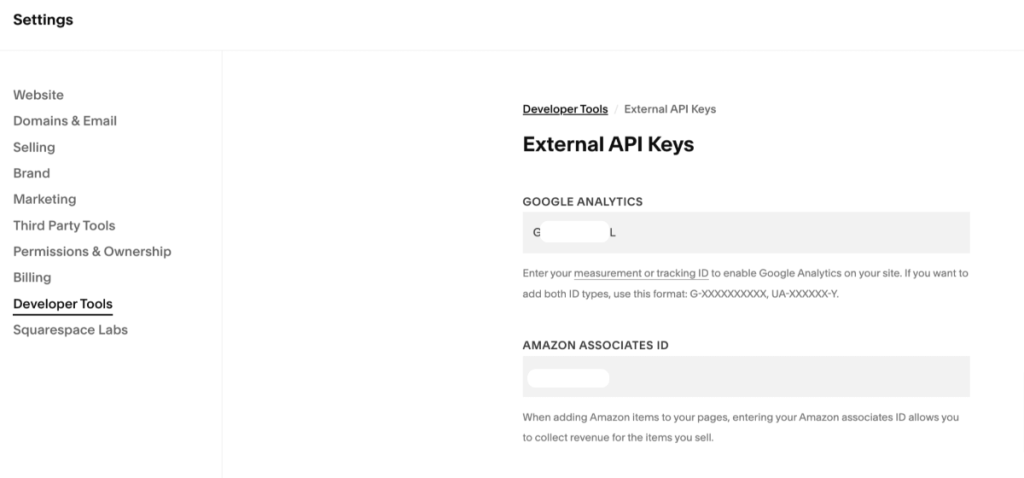
Squarespace supports eCommerce tracking automatically after you enter the Google Tag, making it the best option to add Google Analytics 4.
Google Tag Manager is a free tool to add Google Analytics and create custom events to track interactions that ocurr on your website.
Google Tag Manager can also be used for other platforms such as Meta, Linkedin Insight tag and other tools for marketing and website professionals.
The Google Analytics tag can be added to Google Tag Manager by adding the Google Tag option. If you use Google Tag Manager to track custom events, but prefer to keep Google Analytics tracking natively in a platform (e.g. BigCommerce, WordPress or Squarespace) you can make sure the Google Tag has no page view trigger to fire that tag.
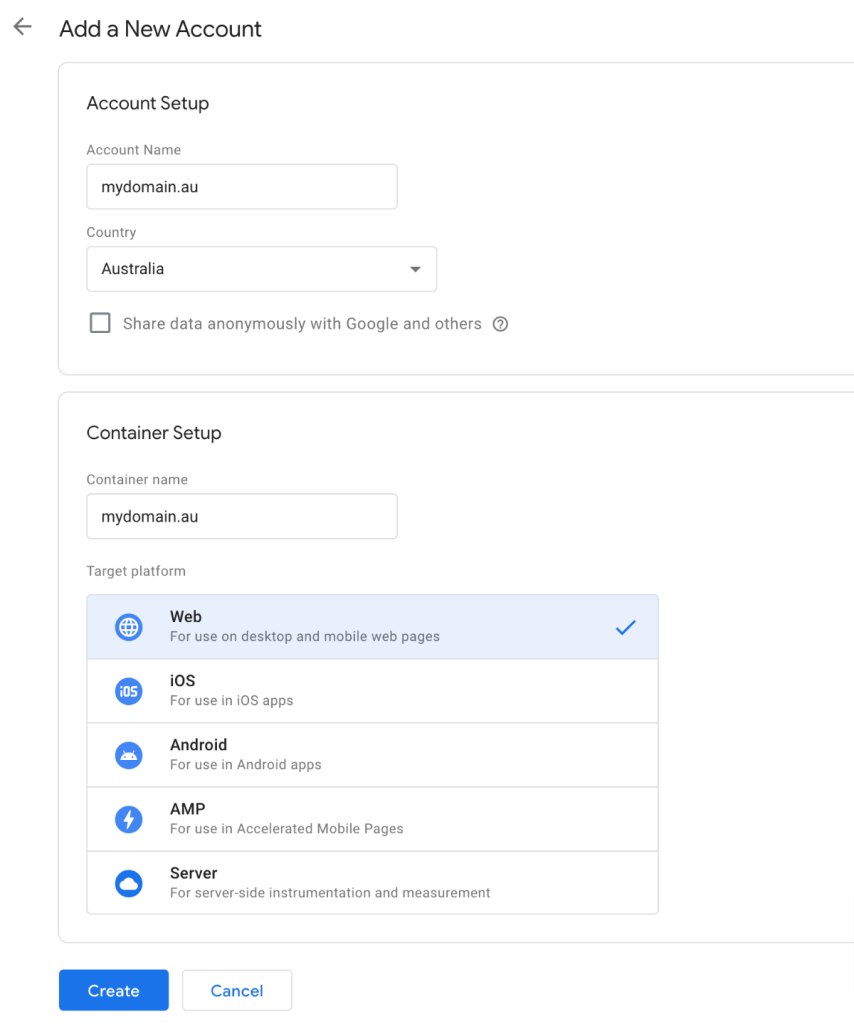
Account name: website or business name.
Country: your origin e.g. we’re in Australia.
You have the option to share data anonymously with Google (optional).
Under the container setup
Container name: website is usually best.
Target platform: if you’re tracking a website and it’s not server-side tracking select “Web”.
After doing this, you will install Google Tag Manager on your platform. The main difference is there is also an opening <body> tag to install GTM if you’re adding the full javascript code method.
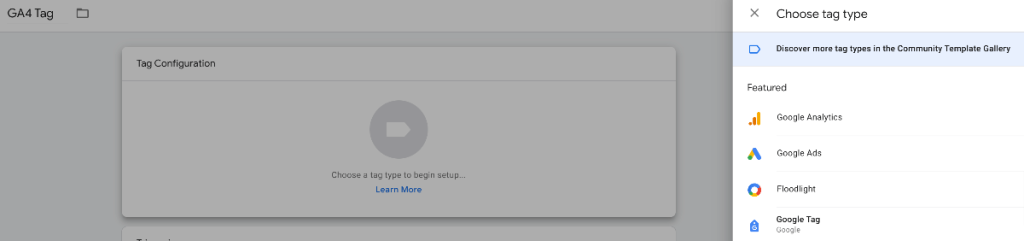
Once you’ve created the account now press “Add new tag”.
Then press “Save” and after closing the box “Submit” the tag.
For Google Tag Manager to work, make sure you have installed the Google Tag Manager base code to your website.
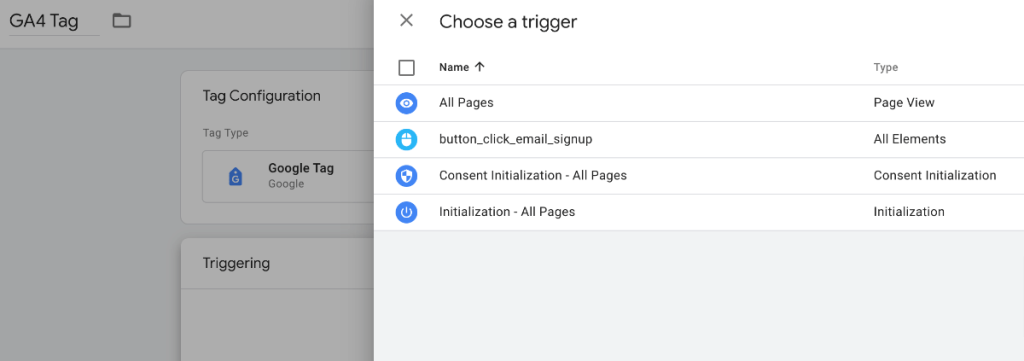
You can check whether the tag is firing in the data stream section.
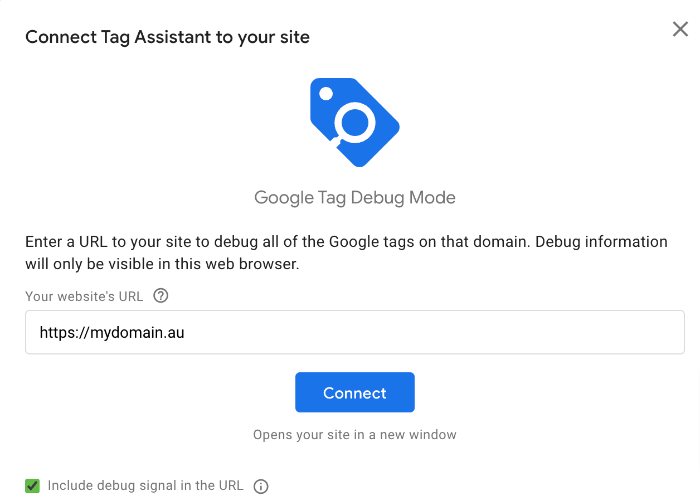
Or you can use the free Google Tag Assistant.
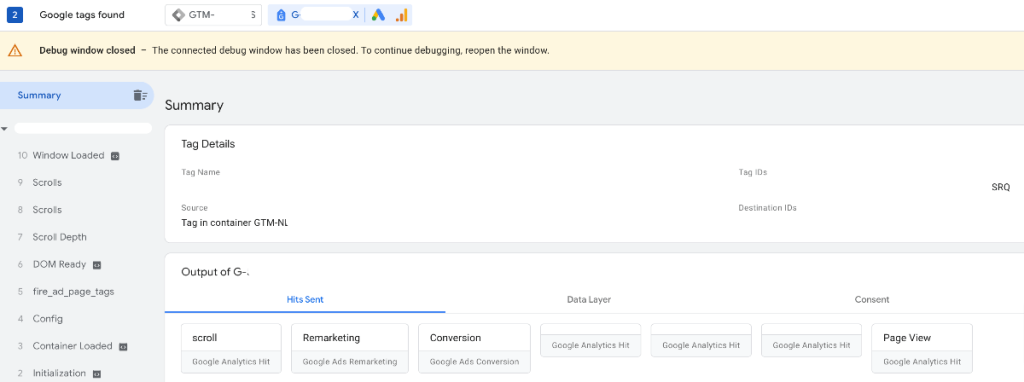
Look for the Google Tag. When visiting a page make sure you get a “Page view” on your Google Analytics 4 tab.
Good to know: You can use this tool to test other events e.g. Scrolls when you scroll down 90% your page and other custom events.
If something is not connecting, you can do a few things. Check:
Use filters to exclude your own traffic or your teams. GA4 no longer has a View setting, which means getting the filters right is crucial *see also Step 7.
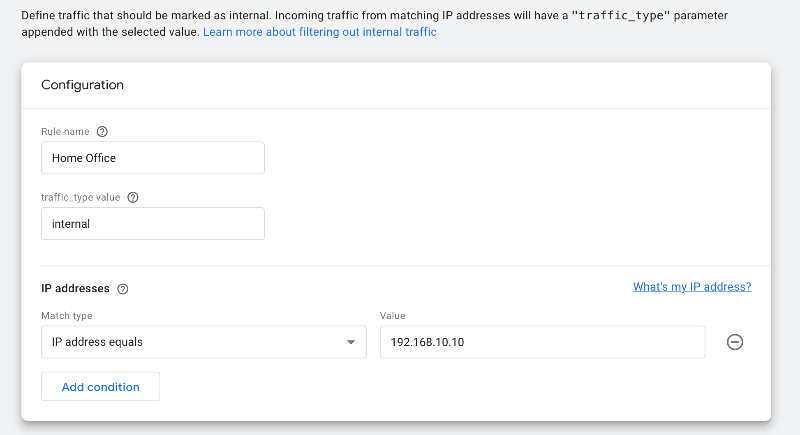
Rule name: to represent whose IP it is.
Traffic_type value: internal should be left as default (unless advanced user).
IP addresses: select the match type and then enter the value. Usually suggest “equals”.
A referral exclusion prevents users from starting a new session when they come from a given website. It turns the traffic from a referral to direct traffic.
For instance, if you have a membership site on another domain that users then come back to yours, you may find it useful to exclude the membership site domain as a referrer.
Another important use case is for eCommerce stores that have payment gateways, such as Afterpay, which may take the user out of the site before completing the purchase. Doing this takes away the previously known information about the user, incorrectly attributing a sale to Afterpay compared to the channel they came from.
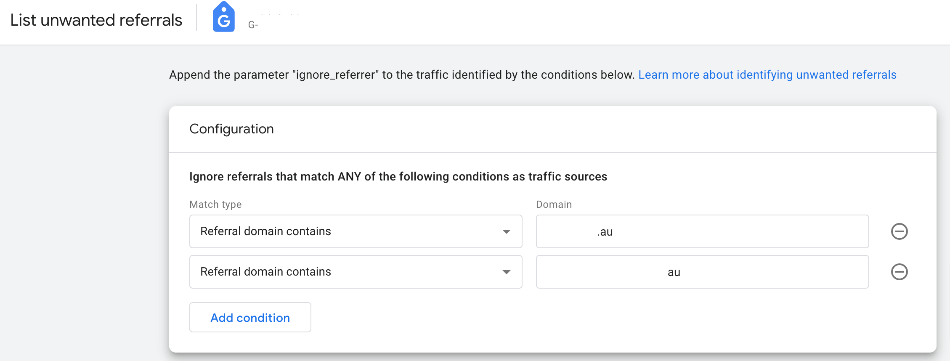
Good to know: Add your domain as a backup. Google Analytics is meant to exclude your domain automatically, but if that fails, you’ve added a plan B.
It’s now time to improve your data collection.
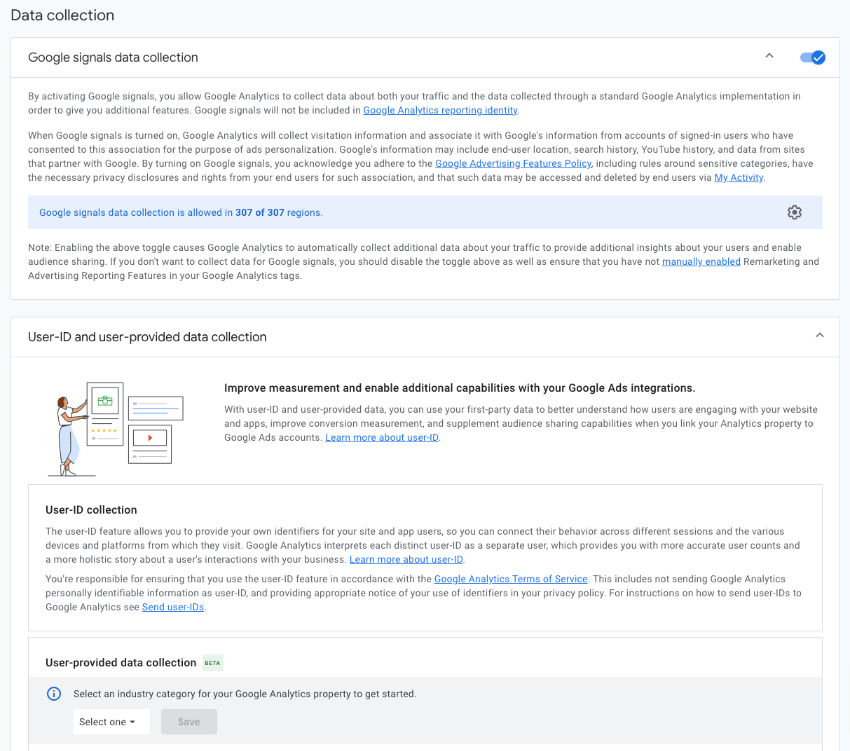
Google Signals is a cross-device data capture tool from Google.
Previously, it would cause issues with reporting. However, Google Analytics has resolved this pain point.
Google Signals helps to obtain additional signals from users, such as when someone is signed in to YouTube, to understand them better across devices. In the past, without this, Google could count the same user twice, once on desktop and again on mobile.
The tool is also used for ad personalisation and is needed if you plan to use Google Analytics Audiences in Google Ads or do remarketing.
By turning Google Signals on, you’ll also benefit from age, gender and interest category data. However, due to privacy constraints on web browser tracking and iOS devices, most users will get 10% or less of this data in their demographic reports.
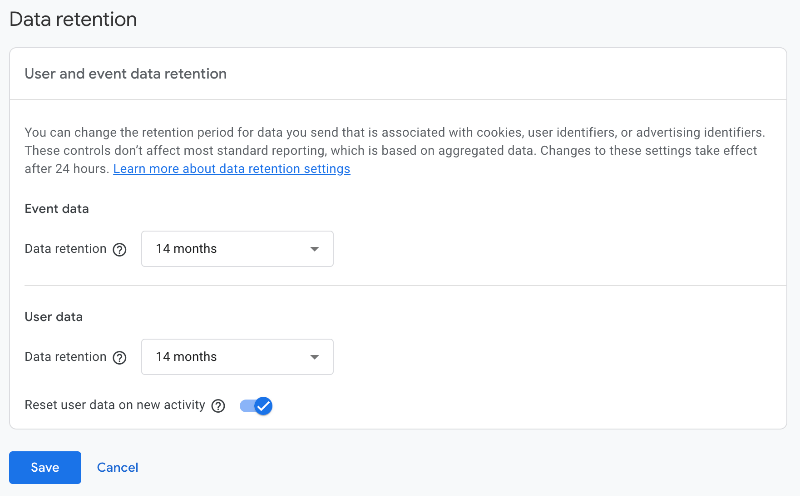
Another key setting is known as data retention.
You can also find this option under the Admin menu for “Data collection and modification”.
The setting only impacts the drag-and-drop Explore (Exploration) reports. All other reports collect and retain data forever.
The default setting for these reports is 2 months. However, you should change this to a maximum of 14.
We recommend you test your filters to ensure you’ve excluded – or included- the right event data. If you didn’t set up a filter in step 4, skip this. To test your filter setup:
Important to know: Only activate once you’ve verified everything is working. GA4 no longer has a separate View setting, so getting this wrong will mean a permanent data loss within a defined period.
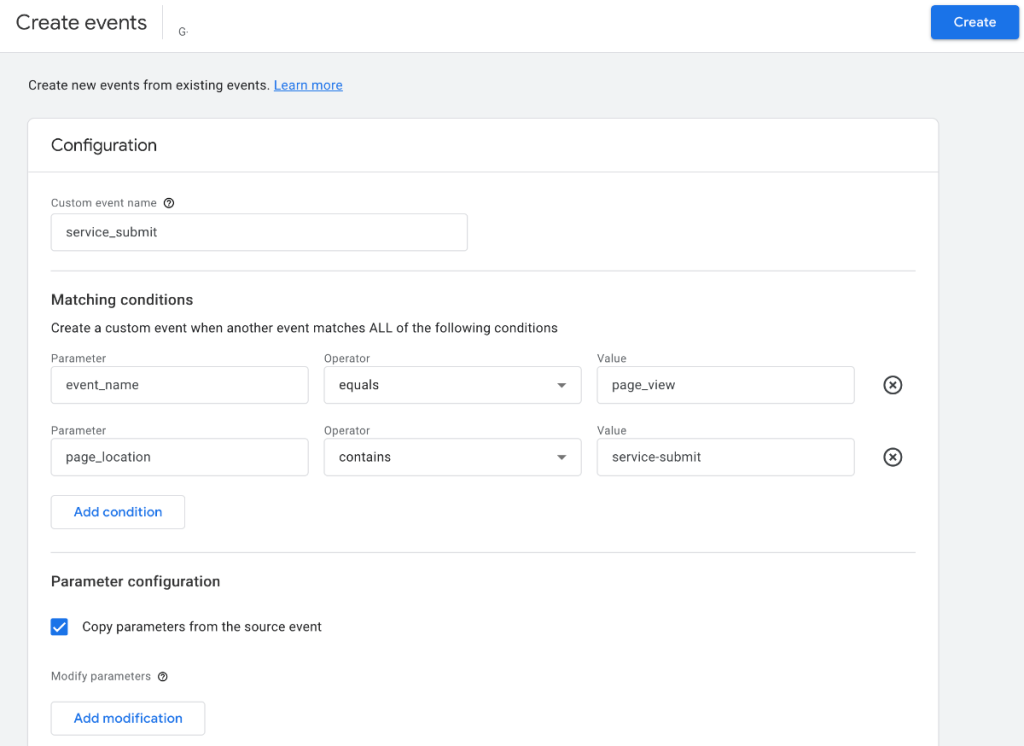
Previous Universal Analytics users will know events as goals. Goals are no more in Google Analytics 4.
The new events setup is harder than the previous one and is similar to the event setup in Google Tag Manager.
If you want to track a page view or a form submission, the easiest way is to create a custom thank you page on your website for each form.
The thank you page redirects the user after they submit the form. It’s also a great way to tailor the message depending on which form the user has submitted.
A redirect is an option you’ll find in most form builders and website builders such as Elementor.
Good to know: Make sure to mark the thank you page as non-index so search engines and people cannot find the page elsewhere.
Once you’ve created your thank you page, it’s time to set it up as an event in GA4.
We recommend using a plugin depending on your platform or Google Tag Manager.
You can also check out our event packages so we can do the hard work for you.
As each platform differs, it is hard to provide specifics. The code to track events can also differ between websites because it utilises the code in your theme known as cascade styling sheets (CSS).
You can add key items such as Google Search Console (all types), Google Ads, and Google Merchant Center to Google Analytics, so you can import more data and make custom reports.
Google Ads connection is also useful when you turn on Google Signals to use Audiences from Google Analytics.
Good to know: Some permissions are required. For example, you need to be the site owner of the Google Search Console.
If you are tracking more than one website on your GA4 property, then you need to define these websites in the cross-domain tracking settings of Google Analytics 4.
However, if your domain is a subdomain, this step does not apply. A subdomain is your primary domain but with something else at the start. For example, say your site is raypastoors.au and you have another site called member.raypastoors.au (example only); this would be automatically tracked and does not need cross-domain tracking set up.
After you’ve completed all these steps, congrats!
You are ready to enjoy the benefits of Google Analytics 4 and are well prepared to deep dive into your data. We also suggest checking out our event tag packages to get the most from your reports.